Switching to solar is exciting, but it rarely happens in a single step. Most projects move through a sequence that includes a home assessment, system design, approvals, physical installation, inspections, and final utility authorization. Homeowners often feel impatient during the early weeks because the roof looks the same and no equipment has arrived yet. In reality, that quiet period is when drawings are finalized, documents are signed, parts are reserved, and the project is lined up for local requirements. When you understand the timeline, you can plan around home access, roof repairs, and any electrical upgrades without feeling caught off guard. You also gain a simple way to measure progress and spot delays early, so the system reaches activation with fewer last-minute surprises.
The Roadmap From Survey to Switch-On
Site Survey: Turning a Quote Into a Real Plan
The site survey is where the installer confirms that your home matches the assumptions made during the initial estimate. A technician measures roof planes, checks shading patterns, and notes obstacles such as chimneys, vents, skylights, and dormers that affect panel placement. They may take photos from multiple angles to help the design team map the array and determine where conduit and junction boxes can run neatly. The survey often includes an electrical review, including the main service panel, breaker capacity, grounding, and available wall space for an inverter or battery equipment. If the home has an older roof, they may comment on the remaining roof life, as solar mounting should not outlast the roofing beneath it. Homeowners can help by providing access to the attic if needed, clearing the path to the electrical panel, and having recent utility bills ready. The end product of the survey is not just data; it’s a confirmed set of site constraints that prevents redesigns later.
2. Design and Engineering: Where Details Get Locked In
After the survey, the project moves into design and engineering, where sketches become formal drawings that can be submitted for approval. The design team creates a layout showing panel locations, setbacks, and spacing, while electrical plans define how modules connect, how the inverter ties into the service equipment, and what safety labels are required. Structural checks confirm attachment points and mounting hardware for the specific roof type, whether asphalt shingle, tile, or metal. This stage is also when equipment selection is finalized—panel model, inverter type, monitoring platform, and optional battery configuration. Homeowners might be asked to approve aesthetic choices such as conduit routing on the least visible side of the house. Coordination sometimes extends beyond solar, too; if the home needs an electrical upgrade, it can intersect with other trades, and a Heating contractor might be scheduled separately to avoid conflicts with attic access or mechanical equipment pathways. Once the design is signed off, changes become harder and can add delays, so clarity here matters.
3. Permitting: Local Rules, Reviews, and Corrections
Permitting is often the longest part of the timeline, even though it’s mostly paperwork. The installer submits plans to the local building department or authority that governs electrical and structural compliance. Reviewers check that the drawings comply with code requirements, include correct equipment specifications, and meet local setback and fire access requirements. Some areas process permits quickly, while others take longer because of staff workload, seasonal volume, or additional documentation requirements. It’s common for a permit office to request corrections, such as clarifying a diagram, adding a label to the plan set, or adjusting a detail for roof attachments. Those corrections are usually straightforward, but they still require time for revisions and resubmission. Homeowners can prevent avoidable delays by ensuring the legal name on documents matches the property records and utility account, responding quickly to signature requests, and confirming whether a homeowners association approval is needed. A clean permit approval ensures a smoother installation day by requiring fewer on-site adjustments.
4. Utility Interconnection: Approval Before Power Flows
In addition to local permits, most solar systems need a utility interconnection review. This process confirms that the system can connect to the grid safely and that the correct meter configuration is in place to track imports and exports. The installer submits an interconnection application that includes equipment details, system size, site diagrams, and, depending on local rules, proof of liability coverage. Utilities may review transformer capacity, grid protection requirements, and whether the home’s service equipment meets their standards. If your area supports net metering or a net billing program, this stage often includes selecting a rate plan and signing program forms. Delays frequently occur when the utility account name doesn’t match the property owner, the service address is formatted differently across documents, or the utility needs additional clarification about equipment ratings. If a battery is included, the review may take longer because of backup power behavior and required shutdown features. Completing the interconnection paperwork accurately is critical because the final “permission to operate” later depends on this file being correct and complete.
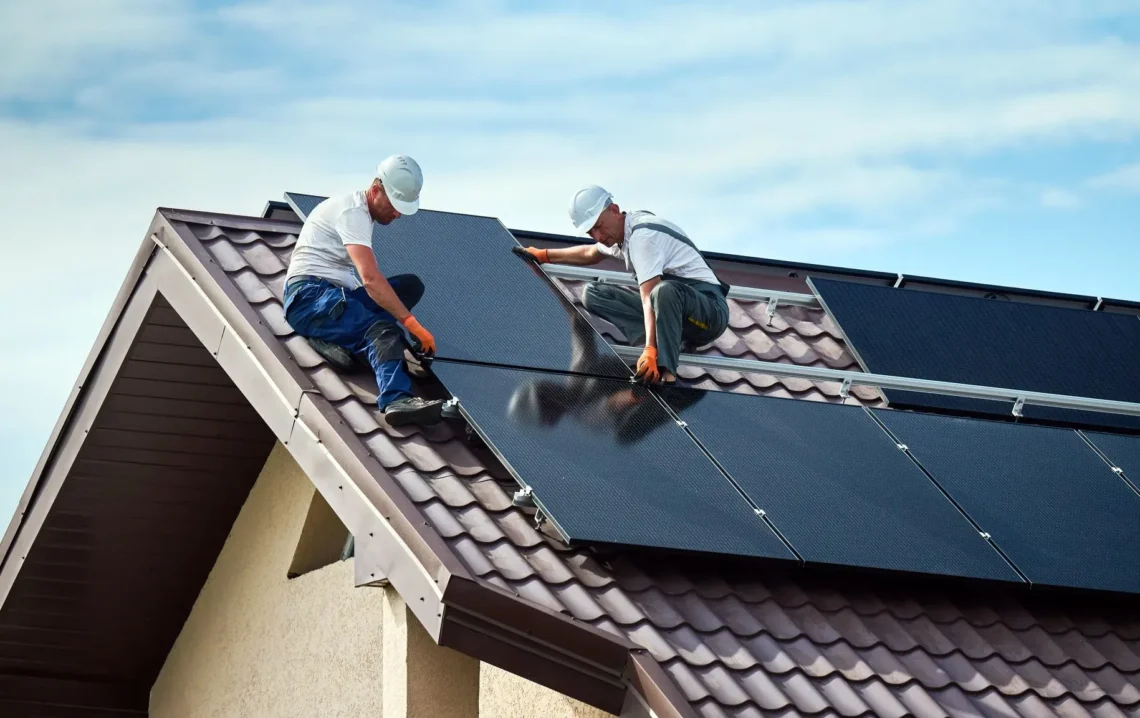
5. Installation: What Happens On the Roof and At the Panel
Once approvals are in place and equipment is delivered or scheduled, installation can move quickly compared to earlier stages. Crews typically start by setting safety anchors and protecting landscaping, then marking attachment points on the roof. Flashing is installed to keep penetrations watertight, followed by racking that supports the panels. After the racking is aligned and secured, panels are mounted and wired, with attention to grounding and cable management. Electrical work happens in parallel or right after the roof work, depending on the crew structure. This includes mounting the inverter, installing disconnects if required, running conduit, adding breakers, and applying code labels near the service equipment. Homeowners may experience brief power interruptions during tie-in, especially if the main panel is modified. Good installation teams also confirm that roof penetrations are sealed properly and that conduit routes are secure and tidy. At the end of installation, the system may be physically ready, but it usually remains off or set to standby until inspection and utility authorization are completed.
6. Inspection and Sign-Off: Proving the System Is Code-Compliant
After installation, the local inspection confirms that the system meets electrical and structural requirements. Inspectors typically check wire sizing, breaker configuration, grounding, rapid shutdown compliance, clear labeling, and overall workmanship. If a battery is installed, inspection often expands to include clearance requirements, shutoff locations, and safety documentation. Many inspections pass on the first attempt, but it’s also common to receive a small correction list, such as adding an extra label, adjusting conduit support spacing, or clarifying a posted diagram near the main service panel. These are usually quick fixes, but they can delay progress if a follow-up appointment is needed or the crew’s schedule is tight. Homeowners can help by ensuring access to the electrical panel, inverter area, and any locked gates, and by securing pets on inspection day. Once the inspector signs off, the installer typically receives the documentation needed for the utility’s final review. That sign-off is a major milestone because it signals that the physical build is complete and compliant, even if the system isn’t activated yet.
7. Permission to Operate: The Final Green Light
Permission to operate, often called PTO, is the last step before the system can fully run and export energy. Even after a local inspection passes, the utility must usually confirm that the interconnection file is complete and that the home has the correct meter configuration for solar. In some cases, the utility swaps the meter; in others, they reprogram it or verify that bi-directional measurement is active. The installer submits final documents, which may include inspection approval, completion photos, and as-built drawings if changes were made during installation. PTO timelines vary widely by area, and utility backlogs can create waiting periods that feel frustrating because the system is already installed. This paragraph is intentionally shorter to highlight an important reality: many solar projects are delayed at the finish line, not because of construction, but because the utility must close out administrative steps. Once PTO is issued, the installer or homeowner can follow a startup sequence, confirm inverter operation, and activate monitoring to track production in real time.
A solar installation timeline follows a predictable path, and understanding each stage makes the experience more manageable. The site survey verifies roof conditions, shading, and electrical capacity so the design reflects real constraints. Design and engineering turn that data into build-ready plans that can pass local review and align equipment choices with the home’s layout. Permitting and utility interconnection take time because they involve documentation checks and approvals that vary by location, but accurate information and quick homeowner responses can prevent unnecessary resubmissions. The installation itself is usually fast, followed by inspection and minor corrections to ensure code compliance. The final step is permission to operate, which unlocks full activation and proper metering. When you know what happens at each milestone, you can plan access, track progress, and reduce delays, making it easier to move from initial survey to a live, producing solar system.